


Auto-Provision Overview
Release time:Jan 16, 2018
1. Overview
This document briefly introduces the details of auto-provision for Flying Voice products, which supports three ways, such as HTTP, HTTPS with client certificates and TFTP with option 66. All Flying Voice products support provisioning, and this document is based on the example of IP542N and G502N.
With option 66, new product will automatically resync(short for resynchronize) to a special configuration file by using TFTP server. The product will request resynchronization configuration file after they get IP address from the DHCP server, Flying Voice product which accesses to the LAN will first resync to the local TFTP server and configure the parameters as set.
What’s more, Flying Voice products support deploying remotely, user just need to set the value of the configuration file rule and resynchronization parameters, the products will automatically resync to remote
HTTP/HTTPS/TFTP server.
HTTP/HTTPS/TFTP server.
2. Configure Profile Parameters
2.1. Setup the configuration parameters
The following picture is the configuration page of provision, it describes all the parameters about provision.
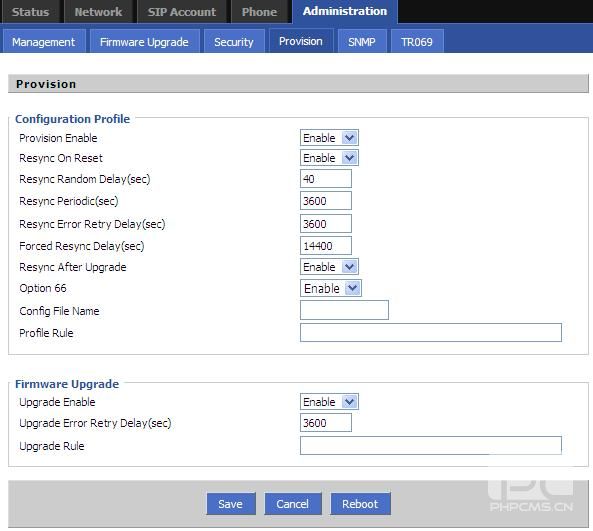
| Parameter Name | Description | Default Value |
| Provision Enable | Enable or disable the Provision functions. |
Enable |
|
Resync On Reset |
Triggers a resync after every reboot except for reboot caused by parameter updates and firmware upgrades. |
Enable |
|
Resync Random Delay |
The maximum value for a random time interval that the device waits before making its initial contact with the provisioning server. This delay is effective only on the initial configuration attempt following device power-on or reset. The delay is a pseudo-random number between zero and this value. This parameter is in units of 1 seconds; the default value of 40 represents 40 seconds. This feature is disabled when this parameter is set to zero. This feature can be used to prevent an overload of the provisioning server when a large number of devices power-on simultaneously. |
40 seconds |
|
Resync Periodic |
The time interval between periodic resyncs with the provisioning server. Set this parameter to zero to disable periodic resyncing. |
3600 seconds |
|
Resync Error Retry Delay |
If the last resync was failure, IP542N will retry resync after the “Resync Error Retry Delay” time |
3600 seconds |
|
Forced Resync Delay |
Maximum delay (in seconds) the VOIP ATA OR IP PHONE waits before performing a resync. The device does not resync while one of its phone lines is active. Because a resync can take several seconds, it is desirable to wait until the device has been idle for an extended period before resyncing. This allows a user to make calls in succession without interruption. The device has a timer that begins counting down when all of its lines become idle. This parameter is the initial value of the counter. Resync events are delayed until this counter decrements to zero. |
14,400 seconds |
|
Resync After Upgrade |
Triggers a resync after every firmware upgrade attempt. | Enable |
| Option 66 |
If or not enable DHCP option 66 to override server. If enable, the parameter 'Profile Rule' has no effect. |
Yes |
|
Config File Name |
Configuration File Name is used for In-house provision mode only. When use TFTP with option 66 to realize provisioning, user must input right configuration file name in IP542N's webpage. When disable Option 66, this parameter has no effect. |
Different products have different default value, for example:I P542N.conf |
|
Profile Rule |
This parameter is a profile script that evaluates to the provisioning resync command. The command is a TCP/IP operation and an associated URL. The TCP/IP operation can be TFTP, HTTP, or HTTPS, if user wants to use this way to realize provisioning, user must disable Option 66. The file name can have macros, such as $MA, which expands to the device MAC address. Such as: https://192.168.20.17/param_$MAU.conf |
Empty |
|
Upgrade Enable |
Enables firmware upgrade operations independently of resync actions | Enable |
|
Upgrade Error Retry Delay |
The upgrade retry interval (in seconds) applied in case of upgrade failure. The device has a firmware upgrade error timer that activates after a failed firmware upgrade attempt. The timer is initialized with the value in this parameter. The next firmware upgrade attempt occurs when this timer counts down to zero. |
3600 seconds. |
|
Upgrade Rule |
This parameter is a firmware upgrade script with the same syntax as Profile Rule. Defines upgrade conditions and associated firmware URLs. Such as: https://192.168.20.17/G502_F107_S334.bin |
Empty |
2.2. Profile rule and upgrade file
The syntax of profile rule and upgrade rule is as follows:
[scheme://][server IP or domain[:port]]/file path
♦While scheme is one of the following values:
http
https
tftp
File path: this is a virtual directory to the server.
♦Macro expansion applies with URLs.
♦The following are two examples of valid URLs:
tftp://prov.call.com/cpe/CW$MA.conf
http://neptune.speak.net:8080/prov/$PN/$MAU.conf
3. Macro expansion
IP542N support macro expansion, the variables available for macro substitution are MA、MAU、MAC、PN、SN、IP、SWVER and HWVER. The macro variables are invoked by prefixing the name with a ‘$’ character (e.g.$MAC). The substitution works even within a quoted string, without requiring additional escapes.
If the variable name is immediately followed by an alphanumeric character, enclose the variable name in
parentheses(e.g.‘$(MAC).conf’).The following is the description chart for macro expansion"
If the variable name is immediately followed by an alphanumeric character, enclose the variable name in
parentheses(e.g.‘$(MAC).conf’).The following is the description chart for macro expansion"
| Macro Name | Macro Expansion |
| $ |
The form $$ expands to a single $ character. The form $$MAU expands to $0021F2011B19. The form $MAU expands to 0021F2011B19. |
| MA | MAC address using lower case hex digits, for example, 0021f2011b19. |
| MAU | MAC address using upper case hex digits, for example 0021F2011B19. |
| MAC |
MAC address using lower case hex digits, and colons to separate hex digit pairs, for example 00:21:f2:01:1b:19. |
| PN | Product Name, for example G502 or VOIP ATA. |
| SN | Serial Number, for example E3C08109000051 |
| IP | WAN IP address, for example 201.45.12.89 |
| SWVER | Software version, for example v3.3.8 |
| HWVER | Hardware version, for example v1.0.1 |
Flying Voice products can support 4 ways to realize macro expansion:
♦ During macro expansion, expressions of the form $NAME and $(NAME) are replaced by the contents
of the named variables.For example, a IP542N with Mac address 0021F2011B19,$(MAU)config.cfg
macro-expands into 0021F2011B19config.cfg;
♦ If a macro name is not recognized, it remains unexpanded. For example, the name STRANGE is
not recognized as a valid macro name, while MAU is recognized as a valid macro name;
So $STRANGE$MAU.cfg macro-expands into $STRANGE0021F2011B19.cfg;
♦ Macro expansion is not applied recursively. For example, $$MAU expands into $MAU (the $$
is expanded), and not 0021F2011B19, for a device with the indicated MAC address.
is expanded), and not 0021F2011B19, for a device with the indicated MAC address.
♦ Also, the macro expression can qualify the expansion so that only a substring of the macro variable is
used instead of its full value, such as a portion of the MAC address.
The syntax for substring macro expansion is $(NAME:p) and $(NAME:p:q), where p and q are
non-negative integers. The resulting expansion results in the macro variable substring starting at character
offset p, and of length q (or till end-of-string if q is not specified).
For example, for an device with MAC address recursively, the expression $(MAU:4)
macro-expands into the string F2011B19, while the expression $(MAU:8:2)
macro-expands into the string 1B.
The following picture is one example of deploying macro-expansion:
macro-expands into the string F2011B19, while the expression $(MAU:8:2)
macro-expands into the string 1B.
The following picture is one example of deploying macro-expansion:

4. Provision with HTTP/HTTPS/TFTP
4.1. Provision with HTTP
① Install HTTP server, we use Apache, setup httpd-2.2.15-win32.msi by default, then you can see
the apache icon in login item as below:
the apache icon in login item as below:

② Open C:/Program Files/Apache Software Foundation/Apache2.2/conf/httpd.conf, and then do the following changes:
♦DocumentRoot "C:/Program Files/Apache Software Foundation/Apache2.2/htdocs"
to
DocumentRoot "D:/conf/"
♦ <Directory “C:/Program Files/Apache Software Foundation/Apache2.2/htdocs”>
to
<Directory "D:/conf/">
③ Create folder conf in D drive. Put the configuration file into D:/conf/. (When using macro expansion, we can set the file name based on the MAC address of each product, fv0021f2011b19.conf, for example.)
④ Reboot Apache .⑤ Verify server installation
Open the browser and input the URL: http://HTTP server IP address or domain.
If you have built http server successfully, the URL can be well linked and user can see all files in the
directory of the D:/conf/
⑥ Login the webpage of the product, and then go to ‘provision’ column, fill the URL in the file rule, like
http://www.flyingvoice.com/fv$(MAU).conf and disable option 66 because the default value is ‘enable’,click save to submit your changes and reboot the product. With the new parameter settings, the
equipment will resync to the configuration file specified by the URL . For example:
http://www.flyingvoice.com/fv$(MAU).conf and disable option 66 because the default value is ‘enable’,click save to submit your changes and reboot the product. With the new parameter settings, the
equipment will resync to the configuration file specified by the URL . For example:

⑦ If you want to realize firmware upgrading by using provision, put the upgrading file in D:/conf/, and fill
the URL in upgrade rule blank, then save the changes and reboot IP542N.
the URL in upgrade rule blank, then save the changes and reboot IP542N.

IP542N will automatically finish firmware upgrading.
Notice:
♦ User must change the value of DBID_DBASE_VERSION after every modifying, or the product
won't resync. The simplest way is to add one to the parameter.
♦ User must note the status of option 66.
4.2. Provision with HTTPS
① Install HTTP server, we use Apache, setup httpd-2.2.15-win32.msi by default, then you can see the apache icon in login item as below:
② Copy the three files cacert.pem、sslservercert.pem and sslserverkey.pem to C:/Program Files/Apache Software Foundation/Apache2.2/conf/;
③ Open C:/Program Files/Apache Software Foundation/Apache2.2/conf/httpd.conf and then do the following changes:
u DocumentRoot "C:/Program Files/Apache Software Foundation/Apache2.2/htdocs" to
DocumentRoot "D:/conf/"
u <Directory “C:/Program Files/Apache Software Foundation/Apache2.2/htdocs”>
to
<Directory "D:/conf/">
④ Open C:/Program Files/Apache Software Foundation/Apache2.2/conf/extra/httpd-ssl.conf, and do the following changes:
◆DocumentRoot "C:/Program Files/Apache Software Foundation/Apache2.2/htdocs" to
DocumentRoot "D:/conf/"
◆Find #SSLCACertificateFile and set as follows:
SSLCACertificateFile "C:/Program Files/Apache Software Foundation/Apache2.2 /conf/cacert.pem" (remember to delete char '#')
◆ Find SSLCertificateFile and set as follows:
SSLCertificateFile "C:/Program Files/Apache Software Foundation/Apache2.2/conf/ sslservercert.pem"
◆ Find SSLCertificateKeyFile and set as follows:
SSLCertificateKeyFile "C:/Program Files/Apache Software Foundation/Apache2.2/ conf/sslserverkey.pem"
SSLCertificateKeyFile "C:/Program Files/Apache Software Foundation/Apache2.2/ conf/sslserverkey.pem"
⑤ Create folder ‘conf’ in D drive. Put the configuration file into D:/conf/. (When using macro expansion, we can set the file name based on the MAC address of each product,fv0021f2011b19.conf, for example.)
⑥ Reboot Apache.
⑦ Verify server installation
Open the browser and input the URL: https://HTTPS server IP address or domain. If you have built http
server successfully, the URL can be well linked and user can see all files in the directory of the D:/conf/
⑧ Upload Certificate Files
Open the browser and input the URL: https://HTTPS server IP address or domain. If you have built http
server successfully, the URL can be well linked and user can see all files in the directory of the D:/conf/
⑧ Upload Certificate Files
Open the Administration/Security page of your product, and choose Provision CA Certification from
Update Type column, then press the key to choose the directory of cacert.pem, click
  to start uploading. Using the same methods to update Provision Client Certification (sslclientcert.pem) and Provision Private Key (sslclientkey.pem). When finish uploading, the webpage turns as the following one:
Update Type column, then press the
key to choose the directory of cacert.pem, click to start uploading. Using the same methods to update Provision Client Certification (sslclientcert.pem) and Provision Private Key (sslclientkey.pem). When finish uploading, the webpage turns as the following one:

Note: If there is
 request, please fill in 'whatever'.
⑨ Login the webpage of the product, and then go to ‘provision’ column, fill the URL in the file rule, like https://www.flyingvoice.com/fv$(MAU).conf, disable option 66 and click save to submit your changes and reboot the product. With the new parameter settings, the equipment will resync to the configuration file specified by the URL .
Notice:
♦ User must change the value of DBID_DBASE_VERSION after every modifying, or the product
won't resync. The simplest way is to add one to the parameter.
♦ User must note the status of option 66.
♦ User can not realize upgrading with HTTPS, please refer to HTTP or TFTP to realize it.
Notice:
♦ User must change the value of DBID_DBASE_VERSION after every modifying, or the product
won't resync. The simplest way is to add one to the parameter.
♦ User must note the status of option 66.
♦ User can not realize upgrading with HTTPS, please refer to HTTP or TFTP to realize it.
4.3. Provision with DHCP and TFTP
4.3.1. Install TFTP Server and DHCP Server
(1) Install TFTP Server
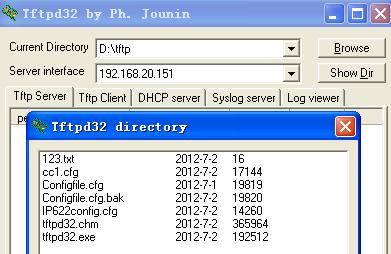
① Put configuration file( for example: Configfile.cfg) and tftpd32.exe in the same directory;
② Open tftpd32.exe, and press to check whether there is Configfile.cfg and see the tftp Server IP address(the address is 192.168.20.151 in the following picture)
① Put configuration file( for example: Configfile.cfg) and tftpd32.exe in the same directory;
② Open tftpd32.exe, and press
to check whether there is Configfile.cfg and see the tftp Server IP address(the address is 192.168.20.151 in the following picture)
③ Open the CMD, input "tftp Server IP get Configfile.cfg", the results with "Transfer Successful" indicates
the tftp Server has been well established.
the tftp Server has been well established.

(2) Install DHCP server
 Picture 4.3.1 |
♦ IP pool starting address: is the IP address will be distributed to DHCP client. ♦ Size of pool: is how many IP address you want to distribute. ♦ WINS/DNS Server: is the IP address of DHCP server, we usually use PC IP address. ♦ Default router: is the default router of DHCP server, we usually use PC IP address. ♦ Mask: usually is 255.255.255.0 ♦ Additional Option: option 66 and server IP address. |
4.3.2. In house provision with DHCP and TFTP
② Open IP542N's webpage, disable option 66 and fill in Profile Rule and Config File Name. For example:

the same catalog that TFTP32.exe is saved, such as tftp://192.168.1.1/IP542N.bin. Save your change and reboot the product. It will automatically start to upgrade.

Notice:
♦ Users must change the value of DBID_DBASE_VERSION after every modifying, or the product
won't resync. The simplest way is to add one to the parameter.
♦ Users must notice the status of option 66, no matter which way to realize provision, including
HTTP, HTTPS and TFTP.
When deploying a large number of IP phones on the network, it is best to use DHCP 'option 66' to automatically instruct the phone with the provisioning URL and other parameters.
① Within a LAN environment, connect a PC and IP542N to a hub, switch, or small router.
② On the PC, install and activate a TFTP server as referred in section 4.3.1.
③ On the TFTP server, install DHCP server as referred in 4.3.1, fill the two blanks in with 66 and server IP. The IP address is the one that TFTP server will request the configuration file from.
② On the PC, install and activate a TFTP server as referred in section 4.3.1.
③ On the TFTP server, install DHCP server as referred in 4.3.1, fill the two blanks in
with 66 and server IP. The IP address is the one that TFTP server will request the configuration file from.
④ Make sure the configuration file has been put into the directory. For example, in Picture 4.3.1, the
directory is D:\tftp.
directory is D:\tftp.
⑤ Make sure the name of configuration file is as the same as the default file name on WEB. In the case of
device IP542N, the default name of Option 66 configuration file is IP542N.conf, the configuration file in directory should also be IP542N.conf.
⑥ Reboot device, and then log in the WEB to verify that the parameters have been correctly changed.
After IP542N finishes rebooting, it gets configuration file from TFTP server and reboot automatically again
to configure new settings.
Notice: user must input right configuration file name in IP542N's webpage, or IP542N can not finish configurating.
4.3.3. Remote Provision with TFTP
If you need a solution that does not require DHCP ‘Option 66’, you can also manually insert the provisioning URL in each phone in its webpage.
① Within a LAN environment, connect a PC and IP542N to a hub, switch, or small router.② Open IP542N's webpage, disable option 66 and fill in Profile Rule and Config File Name. For example:
③ Press Save button and reboot IP542N, after IP542N get configuration file, it will automatically configure.
If you want to use TFTP with internet, it is the same. Disable Option 66 and fill in right Config File Name and Profile Rule, like tftp://www.flyingvoice.com/fv$(MAU).conf.
Notice:
If you want to use TFTP with internet, it is the same. Disable Option 66 and fill in right Config File Name and Profile Rule, like tftp://www.flyingvoice.com/fv$(MAU).conf.
♦ User should make sure that your TFTP server can be accessed via Internet when use TFTP with
Internet.
♦ Option 66 and Profile Rule in a sense have the same function, that is to configure the device by uploading configuration file. However, Option 66 cannot simultaneously work with Profile Rule. In
another word, only one of them works at one time. On the other hand, the priority of Option 66 is higher than Profile Rule. Therefore, if Profile Rule is preferred, Option 66 should be set ‘disable’ or set DBID_PRV_OPTION66_ENABLED=0 in configuration file.
According to upgrading, it is the same .When you finish setting TFTP server, you put the upgrading file in Internet.
♦ Option 66 and Profile Rule in a sense have the same function, that is to configure the device by uploading configuration file. However, Option 66 cannot simultaneously work with Profile Rule. In
another word, only one of them works at one time. On the other hand, the priority of Option 66 is higher than Profile Rule. Therefore, if Profile Rule is preferred, Option 66 should be set ‘disable’ or set DBID_PRV_OPTION66_ENABLED=0 in configuration file.
the same catalog that TFTP32.exe is saved, such as tftp://192.168.1.1/IP542N.bin. Save your change and reboot the product. It will automatically start to upgrade.
Notice:
♦ Users must change the value of DBID_DBASE_VERSION after every modifying, or the product
won't resync. The simplest way is to add one to the parameter.
♦ Users must notice the status of option 66, no matter which way to realize provision, including
HTTP, HTTPS and TFTP.
4.4. Encrypt the Configuration File
Using encrypt file to encrypt param.conf in Linux with command:
[./encrypt_file] [key] [source file name] [destination file name]
Example:
# key = 123456, source file is config.cfg, destination file is config-enc.cfg, the command is:
[./encrypt_file] [key] [source file name] [destination file name]
Example:
# key = 123456, source file is config.cfg, destination file is config-enc.cfg, the command is:

When this form of encryption is used to encrypt a configuration profile, the product needs to be informed
of the secret key value to decrypt the file. This value is specified as a qualifier in the pertinent profile URL with [--key ‘key’]. The syntax is as follows, using an explicit URL:
[--key 123456]tftp://server IP or domain/path/param-enc.conf
For example:

If you have wrong password, IP542N won't get the configuration file when resyncs to the sever. Remember your password carefully. And if you have wrong IP address, IP542N won't resync to the HTTP/TFTP/HTTPS server. Any wrong information may effect the result.That is to say, pay attention to the Profile Rule and other information you need to input.
5. Configuration File Introduction
The param.conf configuration file contents are as follows
Note: ①Every time after modifying param.conf, you must change the value of DBID_DBASE_VERSION,
the simplest way is to add one to the parameter after every modifying.② ‘0’ means ‘disable’, ‘1’ means ‘enable’.
③ Change the value behind the “=” to change the settings
| DBID_DBASE_VERSION=2207 |
/ every time, user tests TFTP/HTTP/HTTPS server, should change the value (add 1 each time)/ |
| DBID_IPMODE=0 |
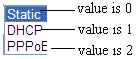 |
| DBID_FIXED_IP_ADDR=192.168.10.207 | /static IP address/ |
| DBID_SUBNET_MASK=255.255.255.0 | /subnet mask/ |
| DBID_DFLT_GW_IP_ADDR=192.168.10.1 | /Default Gateway/ |
| DBID_SIP_ENABLE=1 0 0 0 |
/”1” enable SIP, “0” is disable. Four numbers respectively represent line1, line2, line3, line4. Use tab for separation. |
| DBID_WEB_SIP_SERVER=192.168.10.200 | /the value of SIP Server IP Address/ |
| DBID_WEB_SIP_SERVER_PORT=5060 | /the value of SIP Server port/ |
| DBID_WEB_SIP_OUTBOUND=192.168.10.201 | /the value of BACKUP OUTBOUND PROXY IP Address/ |
| DBID_WEB_SIP_OUTBOUND_PORT=5060 | /the value of BACKUP OUTBOUND PROXY port/ |
| DBID_WEB_SIP_OUTBOUND_BACKUP=192.168.10.202 | /the value of OUTBOUND PROXY IP Address/ |
| DBID_WEB_SIP_OUTBOUND_BACKUP_PORT=5060 | /the value of OUTBOUND PROXY port / |
| DBID_SIP_DIS_NAME=23103_name | /the name of sip account |
| DBID_SIP_PHONE_NUM=23103 | /the value of phone number. |
| DBID_SIP_ACCOUNT=23103 | /set the value of account for each line. |
| DBID_SIP_PASSWORD=23103 | /set the value of password for each line. |
| DBID_PRV_OPTION66_ENABLED=0 |
= 0,Disable the DHCP option66, URL in profile_rule will be used; =1, Enable DHCP option66, URL in profile_rule will be omitted. |
 Back to list


