


Multi Functional Key Overview
Release time:Jan 16, 2018
1 Introduction
This overview briefly introduced the multi-functional key function of Flying Voice products. To get more information about multi-functional key function, please refer to the specific user manual.
Our IP652 and IP622 can support multi-functional key function. IP622 has 10 multi-functional keys, and IP652 can total support 260 multi-functional keys with 20 multi-functional keys in basic board and the others in EXP40 (IP652 can support six EXP40 mostly, and each EXP40 have 40 multi-functional keys).
You can configuration multi-functional key to speed dial, BLF, shortcut key, call pickup and call park. Each multi-functional key supports the five functions, you can configuration them as you want.
Note: The BLF and call park need your SIP server or PBX support, so please check with your provider or administrator before using or testing.
2 Configuration
Assuming that you want to use the multi-functional key function on IP652 or IP622, you should login web to open Phone/Multi-Functional Key webpage firstly before configuration.

Picture 1
Phone/Multi-Functional Key webpage
2.1 Webpage
Below picture 2 is the configuration page of IP622, and picture 3 is the one of IP652:
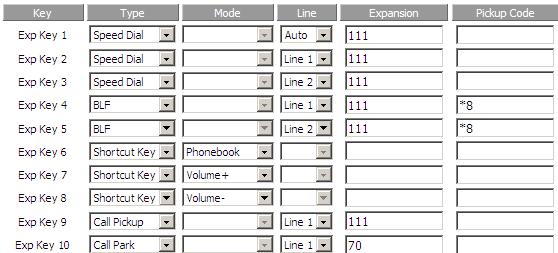
Picture 2 Configuration page of IP622
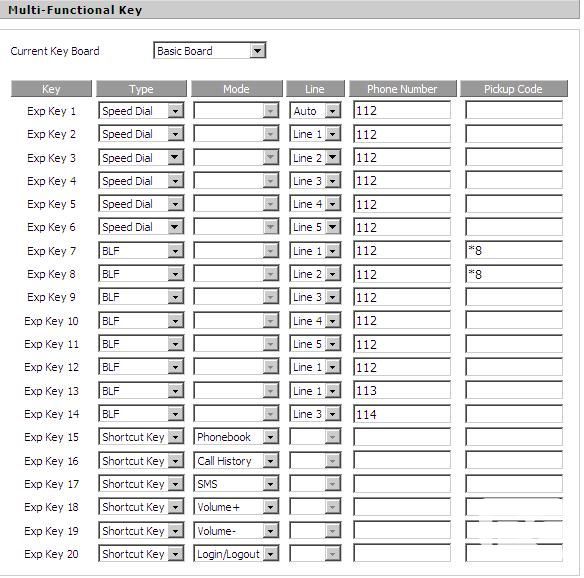
Picture 3 Configuration page of IP652
2.2 Configurable Parameters
Below table 1 explain the definition of parameters.| Parameters | Definition |
 |
Choose one board to configuration |
 |
The series number of multi-functional key |
 |
The type you want to configured, there are five types: speed dial, BLF, shortcut key, call pickup and call park. |
 |
The function mode of shortcut key you want configuration to the exp key. Configurable when Type is shortcut key. |
 |
The line you want to configuration, auto stands the highest priority of registered line, priority is from line 1 to line N (for IP652, N is 5; for IP622, N is 2). |
 |
Fill in the phone number you want to configuration. Configurable when Type is configured to speed dial, BLF, call pickup and call park. |
 |
Set the pickup code. Configurable when Type is BLF. |
Table 1 Definition of parameters
2.3 Configuration Steps
You can use the following steps to configuration the multi-functional key:
Step 1.If you have IP652, choose one current key board to configuration from Basic Board, Expansion
Board N (1/2/3/4/5/6).
Step 2.Choose one Exp Key you want to configuration.
Step 3.Choose one function type from speed dial, BLF, shortcut key, call pickup and call park.
Step 4.Set the other corresponding parameters.
Step 5.Press to save changes, and then you can see the LED under the corresponding exp key button (except BLF) will display green (green stands for the function is active).
Step 6.If you configuration one exp key to BLF, then LED will still display off and the not will appear, you should reboot the device to make changes effective and then the LED will change to green.
Step 2.Configures one Exp key to speed dial, and then choose the line and fill in the phone number. The following picture 4 is a setting example:

Step 3.Press button to save changes and then press
  button to ake changes effective.
Step 1.If you have IP652, choose one current key board to configuration from Basic Board, Expansion
Board N (1/2/3/4/5/6).
Step 2.Choose one Exp Key you want to configuration.
Step 3.Choose one function type from speed dial, BLF, shortcut key, call pickup and call park.
Step 4.Set the other corresponding parameters.
Step 5.Press
to save changes, and then you can see the LED under the corresponding exp key button (except BLF) will display green (green stands for the function is active).Step 6.If you configuration one exp key to BLF, then LED will still display off and the not will appear, you should reboot the device to make changes effective and then the LED will change to green.
3 Functions
3.1 Speed Dial
3.1.1 Creating Speed Dials
Step 1.Access to web, and then open Phone/Multi-Functional Key webpageStep 2.Configures one Exp key to speed dial, and then choose the line and fill in the phone number. The following picture 4 is a setting example:
Step 3.Press
button to save changes and then press button to ake changes effective.
|
Above are the steps to creating speed dials from webpage; You can also creating it from LCD Menu (Menu/Multi-functional key item). 3.1.2 Using Speed Dials |
Taking up configuration for example, user can press the Exp Key 1 button to call 111 or press Exp Key 2 to call 112 immediately.
3.2 BLF (Busy Lamp Field)
This function need you PBX support, so please check with your provider or administrator before testing or using.
3.2.1 BLF
Your system administrator may configure your phone so that you can monitor other user’s phones from your phone. User can create BLF from Menu/Multi-functional key or from your PC in Phone/Multi-Functional Key webpage.
If this feature is configured, some multi-functional key buttons on your phone are assigned to display the status of another user’s phone.
For example, if your one multi-functional key is configured to display Bob’s phone line, the associate multi-functional key will show the status of his phone line like below table 2:
| LED Status | Action of monitored phone |
| Green | Line is idle |
| Red (steady) | Line is active or in use |
| Red (blinking) | Line is ringing |
Table 2
3.2.2 Pickup code in BLF
In addition, if you have configured the pickup code in BLF, you can press the same multi-functional button to pick up a ringing call at his extension.
The example below describes the steps to configuration the pickup in BLF from Webpage, user can also configuration from LCD MENU.
Access to web, and then open Phone/Multi-Functional Key webpage
Then configures one Exp key to BLF, and set Pickup Code (you can get the pickup code from your administrator).
The following picture is a setting example based on Asterisk 1.6 (Asterisk 1.6 support BLF Pickup functions).
Adding pickup code:
Step 1.Fill in the pickup code get from your administrator or PBX.
The example below describes the steps to configuration the pickup in BLF from Webpage, user can also configuration from LCD MENU.
Access to web, and then open Phone/Multi-Functional Key webpage
Then configures one Exp key to BLF, and set Pickup Code (you can get the pickup code from your administrator).
The following picture is a setting example based on Asterisk 1.6 (Asterisk 1.6 support BLF Pickup functions).
Adding pickup code:
Step 2.Press  button to save changes and then press button to make changes effective.
Below picture 5 configured one BLF to monitor 003 in line3 with pickup function.

button to save changes and then press button to make changes effective.Below picture 5 configured one BLF to monitor 003 in line3 with pickup function.
Picture 5 Example of BLF
To pick up a ringing call:
Assuming a ringing call at 003, the associate LED under Exp Key 1 will blinking red.
You can press line3 button (default is line 1), and then press the Exp key 1 button to pickup the incoming call.
Assuming a ringing call at 003, the associate LED under Exp Key 1 will blinking red.
You can press line3 button (default is line 1), and then press the Exp key 1 button to pickup the incoming call.
3.3 Shortcut Key
The steps below described how to configuration the shortcut key from Webpage, user can also configuration from MENU.
3.3.1 Creating
Shortcut Key:
Step 1.Access to web, and then open Phone/Multi-Functional Key webpage
Step 2.Then configures the Exp keys to shortcut key, and set as you need. The following picture 6 is a
setting example:
Step 1.Access to web, and then open Phone/Multi-Functional Key webpage
Step 2.Then configures the Exp keys to shortcut key, and set as you need. The following picture 6 is a
setting example:
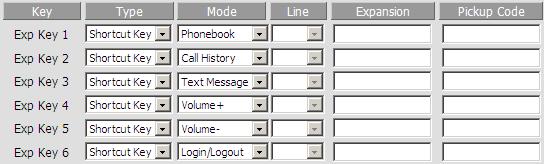
Picture 6 Example of shortcut key
Step 3.Press  button to save changes and then press
  button to make changes effective.
button to save changes and then press button to make changes effective.
3.3.2 Using
shortcut Key:
Press the Exp Key 1, then the LCD will display the phonebook item immediately, and user can configuration it, the steps are same as configuration from menu.
Press the next Exp Keys, and the LCD will display the corresponding item immediately, and user can also configuration it.
Press the Exp Key 1, then the LCD will display the phonebook item immediately, and user can configuration it, the steps are same as configuration from menu.
Press the next Exp Keys, and the LCD will display the corresponding item immediately, and user can also configuration it.
3.4. Pickup
The function of pickup is similar to the speed dial.
The example below describes the steps to configuration the pickup from Webpage, user can also configuration from MENU.
The example below describes the steps to configuration the pickup from Webpage, user can also configuration from MENU.
3.4.1 Adding pickup
Step 1.Log in the web, open Phone/Multi-functional Key webpage.Step 2.Choose one Exp key (assuming is Exp Key 3), and configuration as follows picture 7

Picture 7 Example of call pickup
3.4.2 Using pickup
Press the Exp Key 3 button (the configured multi-functional key) to ring 010235689 quickly.
3.5 Call Park
This function need you PBX support, so please check with your provider or administrator before testing or
using.
using.
3.5.1 Call Park
Call Park is a feature of some telephone systems that allows a person to put a call on hold at one telephone
set and continue the conversation from any other telephone set.
During an active call, pressing one preprogrammed multi-functional key button to transfer the current telephone conversation to an unused extension number and immediately puts the conversation on hold. The telephone system will then display the extension number of
the parked call so that the call can later be retrieved.
If no one picks up the parked call within the set time, the telephone system may ring back the parked call. This transfers the parked call back to the person who originally parked the call.
The example below describes the steps to configuration the call park from Webpage, user can also
configuration from LCD MENU.
3.5.2 Adding
Call Park
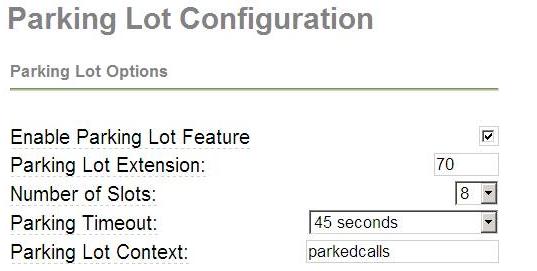
Step 1.View the parking settings in server, below is an example in TrixBox
Step 1.View the parking settings in server, below is an example in TrixBox
Picture 8 parking settings of TrixBox
Step 3.Choose one Exp key (assuming is Exp Key 6), and configuration as follows picture 9

Picture 9 Example of call park
Step 4.Press  button to save changes and then press
  button to make changes effective.
button to save changes and then press button to make changes effective.
3.5.3 Using Call Park
Step 1.During an active call (assuming party 1’s phone number is 6221, party 2’s phone number is 111)
Step 2.Party 1 press the Exp Key 6 button (the configured
Multi-functional key) to park the current conversation and listen the voice prompt patiently (Using TrixBox, you will hear 71, and this is the extension number).
Step 3.Party 3 dial 71 to retrieve the call with party 2.
Step 2.Party 1 press the Exp Key 6 button (the configured
Multi-functional key) to park the current conversation and listen the voice prompt patiently (Using TrixBox, you will hear 71, and this is the extension number).
Step 3.Party 3 dial 71 to retrieve the call with party 2.
 Back to list


