


-
By product category
-
Search by product
- SR3000-5G
- SR3000-5G-Ruggedized
- SR3000
- SR3000-lite
- T5100
- PR12
- T5300
- FWR7302
- FWR9601
- FWR8102
- PR08
- LM150
- G504
- G508
- FTA1101
- FTA5102E2
- FGW4148-16S/24S/32S/48S
- FIP16
- FIP15G
- FTA5101
- FWR9502
- FWR8101
- FWR7102
- P23G
- P23GW
- P22G
- P22P
- P21/P21P
- P20/P20P/P20G
- P11W
- P10W
- P11/P11P/P11G
- P10/P10P/P10G
- FIP16Plus
- FIP15G Plus
- FIP14G
- FIP12WP-R
- FIP13G
- FIP12WP/ FIP12WP Home
- FIP11C/FIP11CP
- FIP10/FIP10P
- P11LTE
- P10LTE
- i12/i12V
- i11/i11V
- P2EXP
- i86V-01/02
- PB01
- i86-01/02/03
- FTA5111
- HB01 & USB433
- FTA5120
- HP200
- BT50
- EHS10
- FPX9102H
- SW7R-Pro
- FRPS
- FACS
- FDC
-
Find by question type
1. Introduction
1.1 Overview
This artical aims to guide users to upload phonebook to Flyingvoice phone.
1.2 Upload methods
1. Local phonebook(CSV format)
2. Local phonebook(XML format)
3. Remote phonebook updated to local (XML format)
4. Remote Phonebook Download (XML format)
5. LDAP
2. Operation steps
2.1 Local phonebook(CSV)
1. Log in to the web interface of the phone with its IP address.
2. Go to Phone >Phone Book page.
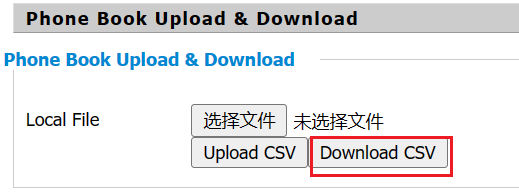
3. Find Phone Book Upload&Download with CSV format, select the local phonebook file and click “upload CSV”.
You can download the CSV template and edit as follows:

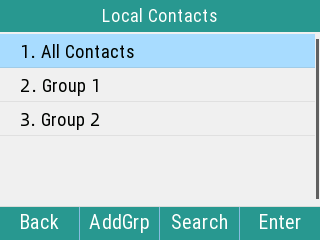
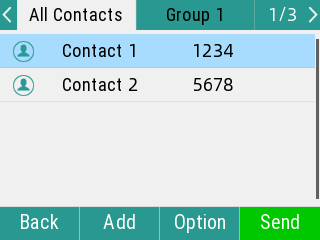
4. On the phone’s screen,press the Directory softkey or navigate to Menu > Directory > Local Contacts, you can see All Contacts and uploaded groups.
2.2 Local phonebook(XML)
1. Log in to the web interface of the phone with its IP address.
2. Go to Phone >Phone Book page.
3. Find Phone Book Upload&Download with XML format, select the local phonebook file and click “upload XML”.
The template is as follows:
<?xml version="1.0" encoding="utf-8"?>
<root_group>
<group display_name="Group 1" ring="1" />
<group display_name="Group 2" ring="1" />
</root_group>
<root_contact>
<contact display_name="Contact 1" office_number="1234" mobile_number="1234" other_number="1234" line=""1"" ring="1" group_id_name="Group 1" default_photo="" auto_divert=""/>
<contact display_name="Contact 2" office_number="5678" mobile_number="5678" other_number="5678" line=""1"" ring="1" group_id_name="Group 2" default_photo="" auto_divert=""/>
</root_contact>
#Noted: The value of “group display_name=” and “group_ip_name=” is optional, you can fill in or leave it blank.
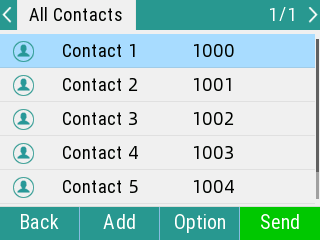
4. On the phone’s screen,press the Directory softkey or navigate to Menu > Directory > Local Contacts, you can see All Contacts and uploaded groups(optional).
2.3 Remote phonebook updated to local (XML format)
1. Log in to the web interface of the phone with its IP address.
2. Go to Phone >Phone Book page.
3. Find Remote phonebook updated to local, and prepare a server such as HTTP server HFS (IP:192.168.80.164) ( The phonebook template is the same as 2.2 Local phonebook(XML) ).
4. Upload the phonebook to the server, and copy the phonebook URL on the server.
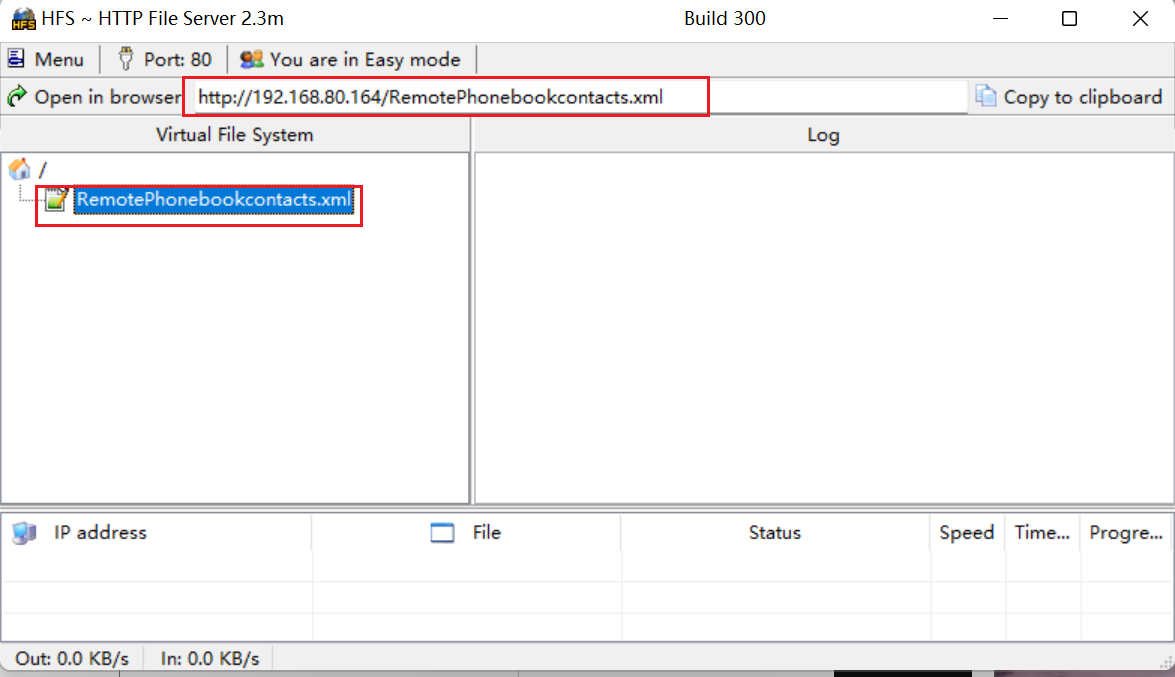
5. Paste the phonebook URL, click on Save and you can see the phone has downloaded the phonebook file on the server.


6. On the phone’s screen, press the Directoty softkey or navigate to Menu > Directory > Local Contacts > All Contacts,you will see the contacts info in the phonebook file.
2.4 Remote Phonebook Download (XML format)
1. Log in to the web interface of the phone with its IP address.
2. Go to Phone >Phone Book page.
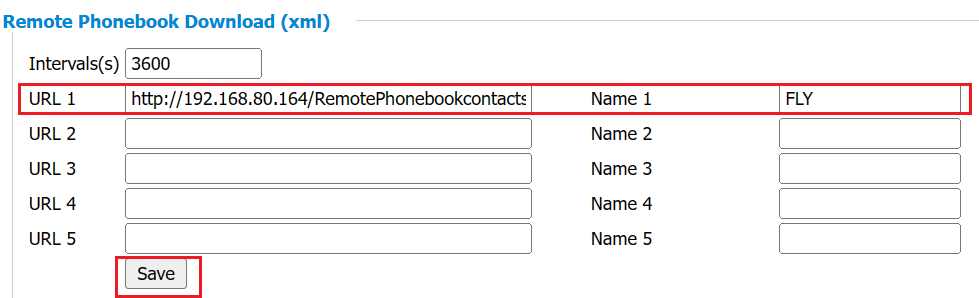
3. Find Remote Phonebook Download(xml), and prepare a HTTP server such as HFS(IP:192.168.80.231).
4. Upload the phonebook to HTTP server, and copy the phonebook URL on the server.
The phonebook template is as follows:
<YealinkIPPhoneDirectory>
<DirectoryEntry><Name>contact 1</Name><Telephone>10000</Telephone></DirectoryEntry>
<DirectoryEntry><Name>contact 2</Name><Telephone>10001</Telephone></DirectoryEntry>
<DirectoryEntry><Name>contact 3</Name><Telephone>10002</Telephone></DirectoryEntry>
</YealinkIPPhoneDirectory>
5. Paste the phonebook URL, click on Save.
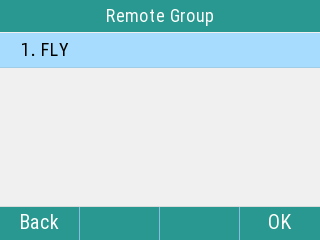
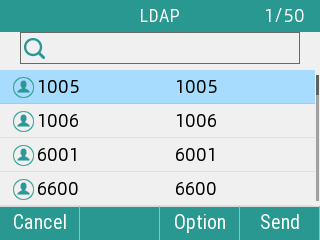
6. On the phone’s screen, navigate to Menu > Directory > Remote Phone Book, you can find the phonebook name and select it to see the contacts.
2.5 LDAP
1. Prepare a LDAP server such as Yeastar PBX(IP:192.168.20.165).
2. Log in to the phone’s web interface with its IP address.
3. Go to Phone > Phone Book > LDAP page, and the configuration introduction is as follows:
|
Item |
Description |
|
Enable LDAP |
The display name of the LDAP |
|
LDAP Name Filter |
Range when searching for name attributes For example: configure (|(cn=%)(sn=%)), search with the letter a, it means to search for all CN or SN attributes beginning with a. For example: configure (&(cn=%)(sn=%)), search with the letter a, it means to search for all CN and SN attributes beginning with a. |
|
LDAP Number Filter |
Range when searching for number attributes For example: configure (|(telephoneNumber=%)(mobile=%)(other=%)), input the number 1 when searching, it means to search for all telephoneNumber starting with 1 or all mobile starting with 1 or all other attribute starting with 1. |
|
Server Address |
It specifies the LDAP domain name or IP address. |
|
Port |
It specifies the LDAP port number, which is 389 by default. |
|
Base |
It specifies the search start position of the server. |
|
User Name |
Username of the LDAP server. |
|
Password |
Password of the LDAP server. |
|
Max Hits (1~1000) |
The maximum sample quantity |
|
LDAP Name Attributes |
Search the Name with the attribute |
|
LDAP Number Attributes |
Specify the number attributes returned by LDAP |
|
LDAP Display Name |
Specify the display name of the contact record on the LCD screen. The parameter value must start with the "%". |
|
Protocol |
Specify the version of the LDAP server, the default version is 3. |
|
LDAP Lookup For Incoming Call |
Enable or disable the incoming call lookup. |
|
LDAP Lookup For Callout |
Enable or disable the callout lookup |
|
LDAP Sorting Results |
Enable or disable the Sorting results. |
An example of web configuration is shown as follows:
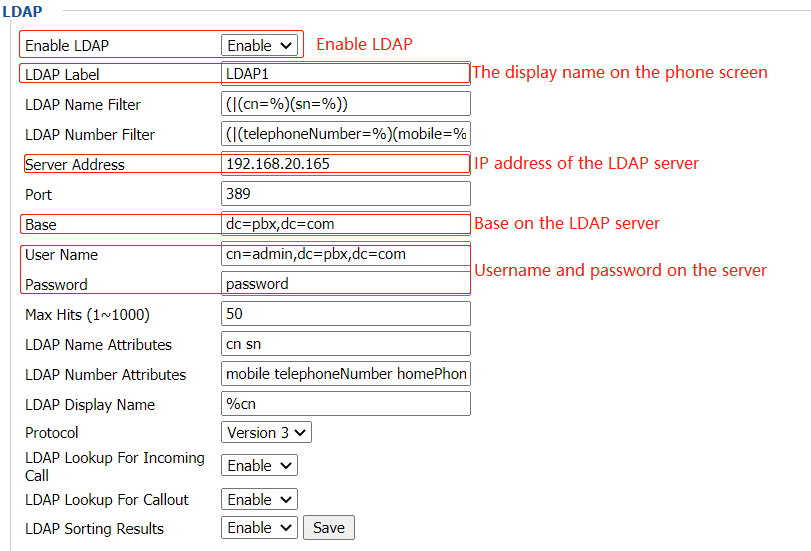
|
Item |
Value |
|
Enable LDAP |
Enable |
|
LDAP Lable |
LDAP1 |
|
LDAP Name Filter |
(|(cn=%)(sn=%)) |
|
LDAP Number Filter |
(|(telephoneNumber=%)(mobile=%)(ipPhone=%)) |
|
Server Address |
192.168.20.165 |
|
Port |
389 |
|
Base |
dc=pbx,dc=com |
|
User Name |
cn=admin,dc=pbx,dc=com |
|
Password |
password |
|
Max Hits (1~100) |
50 |
|
LDAP Name Attributes |
cn sn |
|
LDAP Number Attributes |
mobile telephoneNumber ipPhone |
|
LDAP Display Name |
%cn |
|
Protocol |
Version 3 |
|
LDAP Lookup For Incoming |
Enable |
|
LDAP Lookup For Callout |
Enable |
|
LDAP Sorting Results |
Enable |
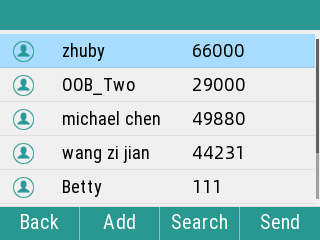
4. After configuring as shown in the figure above, click on Save then the phone will download the phonebook from the LDAP server to the phone Menu > Directory > LDAP1, you can directly call the contact, add to local contact, add to blacklist or do other operations.
 Back to list


