-
By product category
-
Search by product
- SR3000-5G
- SR3000-5G-Ruggedized
- SR3000
- SR3000-lite
- T5100
- PR12
- T5300
- FWR7302
- FWR9601
- FWR8102
- PR08
- LM150
- G504
- G508
- FTA1101
- FTA5102E2
- FGW4148-16S/24S/32S/48S
- FIP16
- FIP15G
- FTA5101
- FWR9502
- FWR8101
- FWR7102
- P23G
- P23GW
- P22G
- P22P
- P21/P21P
- P20/P20P/P20G
- P11W
- P10W
- P11/P11P/P11G
- P10/P10P/P10G
- FIP16Plus
- FIP15G Plus
- FIP14G
- FIP12WP-R
- FIP13G
- FIP12WP/ FIP12WP Home
- FIP11C/FIP11CP
- FIP10/FIP10P
- P11LTE
- P10LTE
- i12/i12V
- i11/i11V
- P2EXP
- i86V-01/02
- PB01
- i86-01/02/03
- FTA5111
- HB01 & USB433
- FTA5120
- HP200
- BT50
- EHS10
- FPX9102H
- SW7R-Pro
- FRPS
- FACS
- FDC
-
Find by question type
[Issue Description]
Users don’t how to synchronize the system time of the phone or they want to change the time and date manually.
[Debugging instruction]
1. The time and date are displayed on the idle screen of the IP phone. You can set the time and date manually or obtain the time automatically over the network via the NTP server.
2. You can also enable the phone to obtain the time from the SIP server.
Change the Time settings on the WEB interface
Press OK or press Menu > Status to view the IP address. Then enter the IP phone address to log in to the WEB page. The default account password is admin/admin. Just like the below picture:

Method 1 Synchronize time with the NTP server
Go to Administration > Management > Time/date Settings, enable NTP ( it is enabled by default), select the correct Time Zone, change the Primary NTP Server(optional) and Secondary NTP Server(optional), set up the NTP synchronization(optional), then click Save & Apply on the bottom of the page to save the settings.


Notes: If the NTP server is a public network address, the phone must be able to access the Internet, otherwise it will fail to sync the time.
Method 2 Set up the time manually
Set the time/date manually. Just like the below picture:

Disable ‘NTP Enable’, fill in the time/date manually on ‘Current Time’, then click on Save & Apply on the bottom of page.
Note: With this method, the time will change to default when the phone reboots.
Method 3 Synchronize time with the SIP server
This function must be supported by the SIP server, and the phone’s time synchronization switch is enabled.
Go to SIP Account > Line1 > SIP Advanced Setup, Enable Sync Clock Time, then click on Save & Apply on the bottom of page.


After that, you can check whether the time is correct on the phone.
Change the Time settings on the phone’s LCD screen
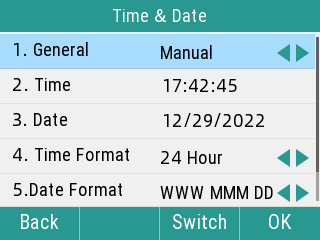
On the idle screen, navigate to Menu > Basic > Time & Date. Just like the below picture:
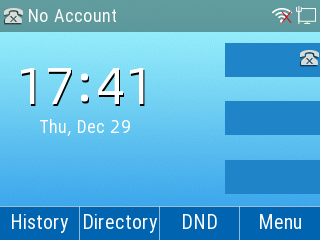
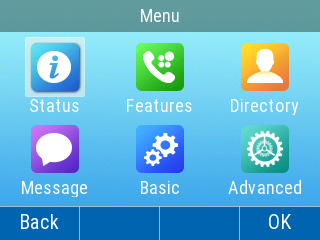
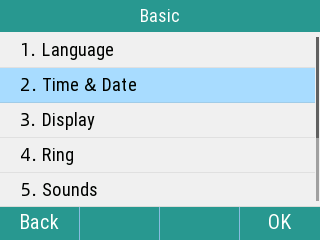
Method 1 Synchronize time with the NTP server
General select SNTP, and then enter the NTP server address, select the time zone and time format, and then press OK to complete the setting.
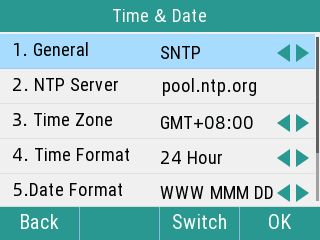
Method 2 Set up the time manually
After entering Time & Date, select General and press < > to select Manual. Then set up the time manually, set up the date, time format and date format, and then press OK to complete the setting.


 Back to list


